
Introduction
Hello reader. If you have accessed this forum, you probably know what charting is. If not, it is essentially using a program to place colored notes, like the ones you play on Rock Band or Guitar Hero, on an instrument track in order to play them on a music rhythm game such as Phase Shift. This guide is written to explain the charting process in a simple but effective way with the musically and technologically inexperienced in mind. It will go over the process of tempo mapping, placing notes, and setting up the song folder using EOF. The tutorial will also explain how to play your song using Phase Shift. Hopefully this guide will be able to answer most of your questions about charting, but if some remained unanswered, feel free to make a reply to this topic or send me a message. Keep in mind that this guide is designed for Windows.
There is also a glossary at the end of this guide that defines the italicized and underlined words in this tutorial. It can be used as a reference when you do not know what a certain term means.
I would recommend that the first song you chart be something relatively simple. It should be a song that has an easy to hear beat (I.E. you can tap your foot to the beat of the song easily). This guide won’t magically turn you into an amazing charter, but it should help you get the hang of the most essential things. From there it takes practice, but you are still free to ask any questions.
Using EOF
There are several programs that can be used to chart songs. This tutorial will use EOF, as it is the most user-friendly in my opinion, and it is the one I am most experienced with. You can download EOF from this topic: Link. Once the file is downloaded, extract the file from the zipped folder by right-clicking the file and selecting “extract all...” The Extraction Wizard should pop up. Click “next” to get to the next screen and click “browse.” From here you can choose where you would like to place the file for EOF. I prefer to place it in “My Documents” but you may place it wherever you please. Then click “next” to extract the file. Locate and double click the now extracted folder and click on the big red “E” titled “eof.” There are 2 icons like this; just double click the other one if an image appears upon double clicking it rather than the program.
You will now need a file of the song you want to chart. It can be an MP3, OGG, or several other formats. One that is not compatible though, is ACC, which is the file used by iTunes when you download a song from the iTunes store. You can get around this though. Open iTunes and go to “Edit” and then select “Preferences.” In the “General” tab, click “Import Settings.” Click on the drop-down arrow next to “Import Using” and select “MP3 Encoder.” Then-right click on the song you wish to chart in your music library and select “Create MP3 Version.” Right-click on the new MP3 of the song and select “Copy.” Open My Documents and right-click in some empty space and select “Paste.” You should now have an MP3 of the song you want accessible by EOF. Keep in mind that if you already have an MP3 of the song (I.E. bought from some other website, extracted from a CD, etc.) then you will not need to go through that process.
Go back to EOF and click “File” and select “New.” Then find the file of the song you wish to chart and double click it. Enter the artist and song title and click “OK.” On the next window, choose “Create New Folder” and click “OK.” Click “OK” on the next screen and EOF will begin to set up your song for charting, which may take a minute or two. Your song is now ready to be charted.
- I strongly recommend using headphones for the rest of the guide. They will greatly improve your ability to chart the song.
Tempo Mapping
The first thing that needs to be done to create a high-quality chart is tempo mapping. This is the process of setting the right beats per minute (BPM) of the song and making adjustments throughout the song when necessary. The first thing you should do is make the song play at a slower speed. You do this by going to “Edit,” then “Playback Rate,” and selecting “50%.” Next, find the first part of the song where the beat is clearly audible. This could include drums, guitar, piano, and any other sound that has an easily detectable beat. Right click on any of the five lanes where you think the first beat is (it does not have to be perfect on your first click):

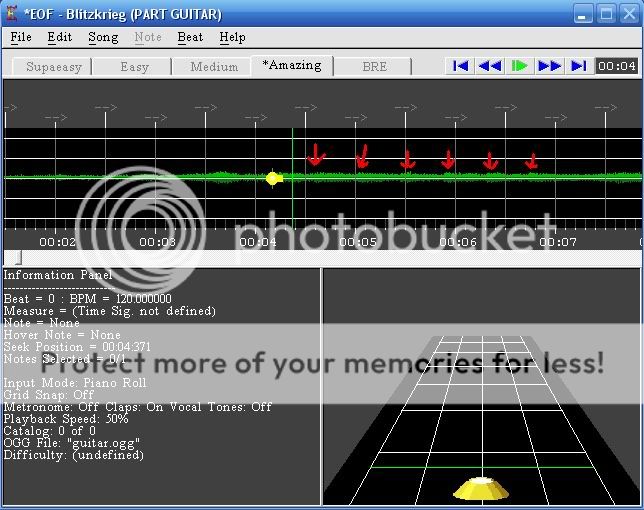
Now press F5 on your keyboard to make the waveform graph appear. This may take a minute to load. The waveform graph will allow you to make a more accurate tempo map by letting you use your eyes to beat sync in addition to your ears. It shows you a graph of the song’s audio levels, which helps you visually find the beat of the song to compare to the where you placed the note using your ears. The beat of the song should be relatively easy to see on the graph, as there will usually be peaks in the graph that are evenly spaced. In the song I’m using as an example, the intro is pretty quiet so it is difficult to tell where the beat is:
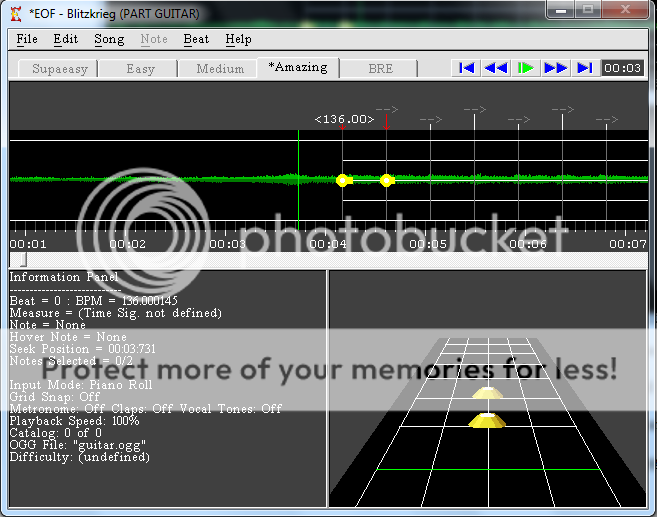
However, your song may have a more identifiable beat, such as when the song I’m charting gets heavier:

Now adjust the note you placed and make it line up with a peak in the waveform graph. Then you should use claps to help you sync the song using your ears. Do this by going to “Edit” and selecting “Claps.” You can also activate them by typing “C” on your keyboard. Claps will play a clapping sound whenever a note you have placed passes by while the song is playing. It is a very effective tool in syncing your notes to the song. Play the song and make sure the clapping sound falls nearly perfectly in time with the beat of the song, and adjust it if it does not. Once you get this note as perfectly in sync as possible with the song, place another note on the next beat, as possibly indicated by the next peak in the waveform graph. Just like the first note, use claps to make sure this note is nearly perfectly in sync with the song. My chart now looks like this:

Your next step in tempo mapping is to adjust the beat lines to the notes you placed. First, go to “File” and select “Preferences.” There, uncheck “Note Auto-Adjust” and click “OK.” Next, drag the first beat marker to the exact same position as the first note you placed:

Then, drag the second beat marker to the exact same position as the second note you placed. My chart now looks like this:

The first beat identifies the BPM of the two notes I placed as 136.36. I prefer to round the BPM off but that is not necessary. The second beat remains at 120 BPM and needs to be changed. First click on the beat that has 120.00 above it and go to “Beat” and select “BPM Change.” Change the BPM from 120 to whatever the BPM of the first beat is. In my chart, the BPM needs to be changed to 136. I would recommend always checking “Adjust Notes.” This will adjust the notes to the changed BPM for all notes after the beat, and while it does not make a difference in this situation, it would be wise to build up a good habit of always keeping this checked. Click “OK” to change the BPM. My chart now looks like this:
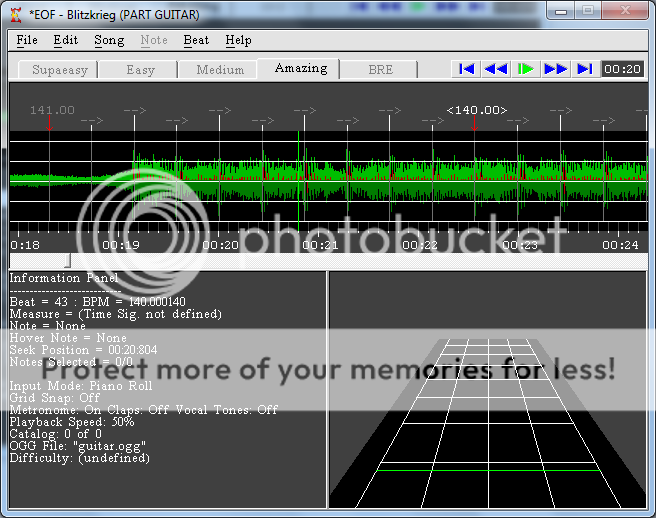
The next step I like to do is remove the anchor from the second beat. An anchor is marked by a red arrow above a beat and prevents earlier BPM changes from affecting notes after the anchor. They are automatically placed when you adjust the BPM of a beat but the second one in my chart is not necessary. Simply click on the second beat and press “A” on your keyboard to remove it. Now remove the two notes from your chart, as they were only used to find the BPM of your chart. Press the “M’ key on your keyboard to activate the metronome. This is a clicking noise that plays along with the BPM you have set for the song. You can use this to compare the BPM you have set to the BPM of the song. Play the song back at 50% speed and listen to the metronome compared to the song. If the clicking comes earlier than the apparent beat of the song for several beats, then the BPM needs to be lowered as it is going faster than the song. If the clicking comes later than the apparent beat of the song, then the BPM must be increased as it is too slow for the song. When the metronome plays on my chart, I realize that the BPM is clearly too slow within the first few beats, so I decide to just adjust the first beat. I change the BPM to 140 and check if that is correct. This is how my chart looks now:

The BPM of 140 seems to work much better for the song. Keep in mind, though, that the BPM of a song is rarely constant, so minor adjustments will likely have to be made throughout the song. Depending on the song, major adjustments may need to be made if there are drastic changes in the song’s sections, such as in complex progressive songs. Once the song gets heavier in my chart, the BPM seems to be too slow for the song. I click on a beat a few beats in front of where it starts to get off sync and go to “Beat” and choose “BPM Change.” I try changing it to 142, but realize that it is too fast, so I then try 141. This works perfectly for several beats, but soon becomes too fast. Rather than adjust the BPM again, I decide to change the BPM of a beat a few beats before it gets off sync again back to 140. I listen to the song with the metronome and find that this works for the rest of the song. Had the BPM needed to be adjusted again, I would have repeated the same steps above of picking a beat slightly before it gets off sync and adjusting the BPM. My chart now looks like this:
Your tempo map is complete at this point and you may move on to placing notes, which is the next section of this guide.
Note Placement
Before you start placing notes, find out whether or not your song seems to have a swing beat. This should be simple for most songs, as a swing beat will usually have a beat like “du-DU du-DU du-DU” or “DU-du-du-DU-du-du” or something similar. Most songs do not have a swing beat, and I wouldn’t recommend charting swing beat songs until you become more experienced in charting. Once you determine whether or not there is a swing beat, you must set the grid snap. This setting forces the notes you place onto a grid. What it is set at determines how much space can be between two adjacent notes. They are labeled as fractions, which represents how many notes are evenly placed within 4 beats, or a measure. So “1/4” grid snap would allow 1 note per beat, and “1/16” grid snap would allow 4 notes per beat. I generally prefer to keep my grid snap at 1/16 if the song does not have a swing beat, since you can still place 1/4 or 1/8 notes if you are in 1/16 grid snap. From here though, there isn’t very much advice I can give, since note placement is rather subjective. Just listen closely at 50% speed to know when notes are played. Make the notes be what you think they would be if you were playing Guitar Hero or Rock Band. Try to match the pitch of the guitar as closely as you can with only 5 frets. This aspect of charting simply requires practice and you will get better as you chart more.
Song Folder/ Playing Your Chart
If you used EOF to chart your song, the song folder should already be set up with everything necessary for playing the song. Now you just need a game to play it on. The game I will use in this guide is Phase Shift, as it is the most user-friendly in my opinion, and I have the most experience with it compared to other games. It is also constantly updated by its developers, so it shouldn’t become outdated any time soon.
To download Phase Shift go to this website: Link. Once there, click on the icon that says “Phase Shift” near the top of the website. Under “updates” there is a list of updates made to Phase Shift since it’s creation, with the most recent updates first. Click on the most recent update to download it. This will take you to a new page where it gives you the option of downloading the “Full” or “Lite” version. I’d recommend the “Full” version, but it’s not completely essential to anything regarding the playing of charts, as far as I know. After clicking on the version you want, you will be taken to another page, where you should click the box that says “Download Now.” If a message appears asking you if you would like to save the file, click “Save File.” If the installation does not start immediately, and you are using Firefox, you can go to your download history by pressing Ctrl + J on your keyboard. The Phase Shift installer should be at the top of the list. If you don’t use Firefox, you can just search for the file on your computer by going to the Start menu, clicking “Search,” and searching “ps_release.” This should be able to find the file, no matter which version you may have downloaded.
Once the installation begins, your computer may ask you if you want to open the executable file, in which case you click “OK.” If a security warning pops up, click “Run.” In the first window, click “I Agree” to move on. I’d recommend downloading the file to My Documents so you can more easily access the “Music” folder (I’ll explain this in the next paragraph), but it isn’t 100% necessary. Once the installation is completed, click “Close.”
Now you will need to place the song folder of the song you charted into Phase Shift’s “Music” folder. If you downloaded the “Full” version, this should already be there, with some songs already in it. If you downloaded the “Lite” version, just go to your Phase Shift folder and create a folder titled “Music.” Once you have a “Music” folder, go to your EOF folder and find the song folder of the song you charted. Right click the folder and select “Cut.” Then go to the “Music” folder in the Phase Shift folder and right click and select “Paste.” Now go back to the main Phase Shift folder and click the icon “phase_shift.” This will open Phase Shift. From here you can adjust settings to your personal preferences and play your chart. Simply plugging your guitar (or other instrument) controller into your computer’s USB port on your computer, assuming your controller has a USB plug, should allow you to use it without any trouble at all. If it doesn’t work, or you don’t have a controller that has a USB plug, you can use your keyboard to play. There are several key combinations that can be used to play. Some possible keys are F1, F2, F3, F4, and F5 which correspond to the colored notes when you play. The same applies to the 1, 2, 3, 4, and 5 keys. The Shift key is used to strum. This isn’t very comfortable compared to a Guitar Hero or Rock Band guitar, but it’s better than nothing, right?
Conclusion
My goal in writing this guide was to explain the process of charting in a simple but effective way, and I hope I have accomplished this goal. If you have any questions or critiques, feel free to reply to this topic or send me a message. I’ll be more than willing to edit this tutorial and answer any questions to the best of my abilities.
Glossary
This is the glossary of all underlined terms in this guide which may be unknown to new charters
Anchor – These are placed on beats by pressing the A key on your keyboard. They prevent this beat and all the beats after it from having their BPM changed by BPM changes that you may place on beats in front of the anchored beat.
Beat – A basic unit of time in a song. It is essentially what you tap your foot to when you listen to a song, and it represents the rhythm of the song. There are usually 4 beats in a measure in most of the songs you’ve probably heard.
Beat Lines – These are the vertical lines in EOF that represent where the beats are in the song you are charting. The closer they are, the faster the BPM, and vice versa.
Beat Marker – These are the right-pointing arrows that are above each beat line. If the beat has a different BPM than the beat before it, or if it is the first beat, there will be a number representing the BPM above the beat, rather than an arrow. They are used to either drag a beat to a new location, or select a beat to modify its BPM. You can also place anchors on them to prevent them from being affected by other BPM changes.
Beats Per Minute (BPM) – This is the term used to describe the speed of a song. Faster songs have a high BPM, and slower songs have a lower BPM. It defines itself rather well, as it represents how many beats occur in a minute of the song, though it can fluctuate often in some songs.
Beat Syncing – In this guide, it is basically a synonym of tempo mapping.
Chart – This is the MIDI sequence of notes that you place in a program, such as EOF, that can be read by a music rhythm game, such as Phase Shift. Charting is the process of creating a chart.
Claps – These are clapping sounds that play whenever a note you have placed in a charting editor passes by as the song plays. They are very useful in determining whether or not the notes you have placed are in sync with the song.
EOF – A fantastic program created by Raynebc that lets you chart songs for music rhythm games such as Phase Shift. It is a very user-friendly program, as it has a nice easy to use interface and it automatically creates the song folder for a chart.
Grid Snap – This allows you to place notes in position with intervals on a grid. The denominator of the fraction represents how many notes can be evenly placed in 4 beats. Therefore, a ¼ grid snap would allow 1 note per beat, 1/16 would be 4 notes per beat, and so on. There are very few instances where a grid snap isn’t used.
Measure – This is a segment of time defined by a certain number of beats. The type of measure is known as a time signature. Most popular songs are in 4/4 time, meaning there are 4 beats every measure. It is not necessary to add a time signature to your chart, so if this confuses you, don’t worry. It took me some time to figure it out when I was less experienced.
Metronome – This feature is similar to claps, but it plays a clicking sound whenever a beat passes in the song, rather then when a note passes by. This is commonly used to identify changes in BPM after the initial BPM is set at the beginning of the song.
Phase Shift – A popular free music rhythm game developed by DWSK that allows its users to play custom charts with ease. It is constantly updated with new and improved features by its dedicated developers.
Song Folder – This is the folder which contains all of the necessary files for playing a chart in a music rhythm game. It is created with all the essential parts automatically when you chart a song with EOF.
Tempo Mapping – This is the process of finding the proper beats per minute of a song, and making adjustments when necessary throughout the song. An accurate tempo map is essential for a high-quality chart.
Waveform Graph – Pressing F5 in EOF will activate this. It is a visualization of the audio levels in the song you are charting, which can be useful when you are tempo mapping. Usually the peaks in the graph represent the beat of the song.