experience you should have no issues with this what so ever.
lets begin by naming the files your going to be modding.
each version of frets have basically the same files that need to be modded. 1.2 thoe requires a few extra files but they are no big deal if you have a good imagination and can imagine what your work will look like before hand.
i went ahead and made some custom templates for each version to better help people know where the graphics need to go for placement with frets setup.
download the template pack you need to work with
frets 1.1 template pack: http://pepness.assassinsdamned.com/tut/temp1.1.rar
frets 1.2 template pack: http://pepness.assassinsdamned.com/tut/temp1.2.rar
lets go into detail on how each pic works for your level design. we will begin with frets version 1.1 first. we will only be dealing with the png files cause from my modding experience the svg files really don't need modding as long as there is a png to go with it.
im going to be ripping apart my advent mod in a full breakdown for this so lets get some learn on shall we?
- 2x, 3x, 4x.png
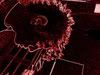
these are the files that control the flair effect you get when getting a multiplier in game. in frets 1.1 it comes straight at you but in 1.2 its more from the top. just open those 3 png files in photoshop and add what you like to them. sometimes its best to not keep the image completely square and erase some of the outside edge for a smoother effect.
this is a example of reno as the 2x flair for the advent mod i did.

- cassette.png
this is the picture that will go behind the selection screen for your songs. if you notice the pic below you will see alot of white and the picture itself is only using a tiny portion of the picture. it needs to be like this. also the white needs to be transparent if you can. i don't see where making it white would really hurt anything but meh, do it anyway. notice also the picture is upside down. it needs to be. also see how the character is place to one side? thats so the cassettes/cd's can flow on the other side with out any of the graphic being lost behind it.
see the pic below for details. this image has been resized to fit better here but needs to stay the actual size in the template folder you download.

-editor.png
this is about the same as the cassette one except this pic will show up when you choose your diffulicty and what not. the same template basically as cassette expect you want to make sure the placement of your pic doesn't interfere with the text for choosing your settings like difficulty and what not.
-game results.png
same as the two above but this will be shown at the end of the game when you receive your score and stars. you want to make sure this pic represents your mod very well considering people will be looking at this almost as much as your playing field. you can tweek your images to make the text you choose fit with the picture if your imagination lets you go that far.
-keyboard.png
this is the picture used for the background of the main menu. anything can placed here as long as it go with your theme. with mod settings now allowing people to make the image rotate or static you have to make this pic for the design your looking for and ask people to make this static or not as seen by your vision for the mod.
-logo.png
this is a tough one. this is going to be the imago that your title of your mod is going to go on. for the template pack i simply just added a name so you can see where it would show up if you wanted the title to be placed toward the right corner. that usually where it would be but this image requires some thinking on your behalf. only experimenting with this image and sizing it will you see how it plays a role in the look of your main menu.
-pose.png
this is for your main theme to come out for people. for example.. say you were making a mod for ozzy fans or something.. then this would be the perfect place to add a pic of ozzy rocking out so something to that effect. just like i said before thoe with the logo.png your going to have to play with sizes and placement to get this pic to fit your mod to how you like it. there isn't set place really for this and can be done only to the limits of your imagination. with some trial and error you will see exactly what im speaking about.
-neck.png
this is the playing feild that the notes are going to be on in game. you can make this anything you like as long as you remember that the top of the pic has to flow with the bottom of it. its just going to repeat your image over and over in game so make sure it flows nicely and seamless. lemme show you a example of this.

see in this picture how the ace of spades on the bottom is carried over to the top? same with the dice on the left side? it has to have a constant flow. lemme make a pic to further show you what i mean. im going to be turning the image sideways just to save scrolling space just for this tut. your actual image needs to be vertical and the size set in the template folder you downloaded.

see what i mean about flow? i added the red lines in the image so you can clearly see where the image begins and ends. its not rocket science.
-star1, star2.png
these images are used for the star ranking you get at the end of the game. star1 is for not gaining a star and star2 is used for actually recieveing a star. again these can be used for anything you like. usually its a logo of some sort fitting your mod. so back to our ozzy example, maybe using a pentagram or something might be best?
flame1.png
this is the biggest and most important pic in the game. this is your playing field. you must remember your neck is going to be going down the middle of this, your going to have scores or amps/meters (if you have the add on mods) in this also. you want your theme to stand out but not distract people from the playing feild. this is another one of thoes trial and error things seeing what works and what doesnt. use the template i provided and place your image in that space where it says and only there.
-hitglow, hitglow2.png
the hitglow is the image that will show when you actually hit a key on a note. the hitglow2 is the image that stays there while the note is being held down right above the key flickering and shining. one big thing in this!!! only lighter colors will show up!! if you want something to be transparent it must be black for this image!
for example using my advent mod..


see how the character is there and the background is black? well you want to do that so youll see this effect. also notice the image is reversed so keep that in mind also
-title, default fonts
this is a simple one. just go find a nice free font you think fits your mod. simply rename the font to both "title" and "default" and add them overwriting of course. when choosing your font make sure all the numbers are there for it as they will be needed for scores and such. these files control the font used for your theme. if i was to do a ozzy theme as i said i would download the font see on this page:
http://www.1001freefonts.com/acquaintance.htm
that site has many fonts there for free and theres many more sites like them. have fun with it. you also want to go into your theme file and change the color for selected color and such to better match the color representation going on in your theme. you can find these usually under "selected color" and such.
-menu.ogg
this is going to be your menu music for you theme. there are many ways and programs to do this but im going to simply tell you what you need to to to make this work. find a song/sound that is about 30 seconds long. you want this to play in the background of your main menu. you need to make sure this sound file is in "ogg" format. example being "menu.ogg". there are many converters out there and windows xp comes with windows movie maker so i suggest taking your sound sample, opening it in movie maker and trimming it to the desired length then saving it. open your saved file in a converter of your choice and converting that sample to .ogg format. add it to your mod folder. bam! your done. simple theme music for your mod.
>> now lets move to 1.2 and what has to be done different with that.
frets 1.2 has some additional files that need to be modded since 1.2 has some extra visual effects it allows different them 1.1. lets go into detail with them.
-bg2.png
this is your playing field for the game. before in 1.1 it was known as flame1 now its this file. also the sizing is different as noticed in the template folder.
-speakers.png
this is going to be the image that pulses with the music. your going to select portions of your bg2 image and add them here. its hard to explain so ill show you with a pic what im talking about.

sorry the erasing is messy but im trying to get the message across. ok! the bg pic is your normal background but speaker is the pic thats going to overlay that pic and pulse with the music. you need to pic things in the pic that would look best pulsating. for the advent mod i choose the flowers. its actually up to you and your mod how you want to do this. remember to only make what you want to pulse in the speaker image there and make the rest of the image transparent. depending on the browser looking at this pic you may see it transparent or white. if you see white in the the speaker pic, well all that white needs to be transparent. hope that explanation made sense!? in the template folder i left the speaker pic as it would have been in my advent mod so you can see what im talking about hands on.
glow.png
this image is whats will rotate under your key presses when you hold down a note. again this can be anything you want and also the same rules apply for what i said about the hitglows dealing with black and light colors. to see a glow in action watch my advent vid
http://youtube.com/watch?v=4Fk5n0hzqD0
go to 58 seconds into the vid. see when i held down the green note and that "sword" was rotating around under the note? thats the glow. the image i used looked like this. its very simple and makes for a cool effect.

-light.png
this is going to control your lighting effects in game. to simply put this..hrmm.. ok! the lighting on frets basically works like this on the light png. you have a total black pic. where ever there is a lighter color showing thats where frets lighting will appear. if you use a solid white the color will be more pronounced but you want to mainly stick with lighter shades so it doesnt blind people. leeme give a example for the advent mod again with the light pic vs. the bg image.

see how i lightened the areas of of the solid black background to match where the light was in my original bg2 pic? thats basically what your trying to do. now go watch the advent demo vid again and watch how the lighting works in game. its very simple once you see in your mind what your going for. i dont think i can think of a better way to explain this then i have. hope you got my point in lighting.
the rest of the files are the same as i mentioned for frets 1.1 so no need to type everything i said before.
summery of all this..
i provided the images in template form with the sizing you need and where to place your pics. i dont think i could have made it anymore simple. if a image is completely empty then it means the whole image itself needs a pic to it. i drew boxes and labeled others so you know where to place your pics. some of the images i said like logo.png and pose.png for example need to be custom fit by you. only through a little trial and error will you see why there isn't a set place for these.
ALSO! in order for a png image to take effect for your mod it has to have a matching SVG file there. i have never modded a SVG file yet and only dealt with the png files and haven't came across a issue yet doing it this way so please!!! make sure your mod folder has a svg to match your png file name.
there is also the fact of making themes files themselves which is located in a text doc in your file folder. these can be very simple and very complicated. i suggest you use the search button for making a more extensive theme file cause different mods require different themes and it just hving the basics like..
[theme]
selected_color = #e4ff00
background_color = #000000
should be enough for anyone new to modding. also in 1.2 there is a stage file. dont mess with it unless you know what your doing. thats all im going to say on that one since this tut is to better educate people new to modding.
so happy modding and hope this helps people a little more. if you come across a problem and need some help then drop me a pm via these forums and ill see what i can do. i will answer your question as soon as i can.
ALSO!
i will not make mods for people. i refuse to. i learned and so can you. if you want the mod bad enough then make it yourself. there is a paint program named gimp that is kinda like photoshop for free. learn to use it and make something yourself or use one of the mods the members here have posted. i didn't spend a hour typing this to teach people only to have me or someone else do the work for them.
ok..
im done!
happy fretting people!!!
btw, is this worth a sticky perhaps?
<3 pepsi